Building your own van conversion is one of those projects that sounds straightforward until you are standing in a gutted Sprinter with a circular saw in one hand and a wiring diagram you don’t fully understand in the other.
That’s not to say you can’t do it. Thousands of people have built incredible DIY vans. But going in with realistic expectations about the time, money, skill, and effort involved will save you from the frustration that derails a lot of first-time builders.
We are a professional van conversion shop in San Diego, CA. We see DIY builds at every stage — from people who completed amazing self-builds to people who started a DIY project, got stuck, and brought the van to us to finish. This guide is an honest look at what a DIY van conversion actually involves, what it costs, where people get stuck, and how to decide if DIY is right for your situation.
What a DIY Van Conversion Actually Involves
A complete van conversion — the kind you can actually camp and travel in — involves multiple trade skills. Here is a rough breakdown of what goes into a full build.
Demolition and Prep
If you bought a passenger van, you need to strip the interior: seats, carpet, headliner, trim panels, sound deadening. If you bought a cargo van, it is mostly bare already but still needs cleaning, rust treatment, and prep for insulation.
This phase takes a weekend or two and requires basic tools. It is the easy part.
Insulation
Every surface — walls, ceiling, floor, and doors — needs insulation. We use Thinsulate for walls and ceiling and XPS foam board for floors. For a full breakdown of insulation options and methods, see our van insulation guide. The material choice matters for moisture management. You don’t want insulation that traps water against the metal body and causes rust and mold.
Getting insulation fitted properly around the van’s ribs, wiring harnesses, and irregular shapes takes patience. It is not technically difficult but it is tedious and time-consuming.
Electrical System
This is where most DIY builders either learn the most or make the most expensive mistakes. A proper camper van electrical system includes:
- Lithium batteries (100Ah to 400Ah+ depending on needs)
- Solar panels (200W to 600W+ on the roof)
- MPPT charge controller
- DC-to-DC charger (charges from the alternator while driving)
- Inverter (converts 12V to 120V for outlets)
- Fuse block and distribution panel
- Wire runs, bus bars, battery disconnect, and grounding
Designing the system correctly means understanding amp draws, wire gauge sizing, fuse ratings, and how all the components interact. Undersized wiring is a fire hazard. Improperly fused circuits are a fire hazard. A missing battery disconnect is a safety issue.
If you are comfortable with basic electrical concepts and willing to learn, this is doable. If the phrase “voltage drop calculation” makes your eyes glaze over, this might be the part worth hiring out.
Plumbing
A basic plumbing system includes a freshwater tank, a 12V water pump, a sink, a gray water tank, and plumbing lines. If you add hot water, you need a tankless water heater. If you add a shower, you need a drain, a shower pan, and waterproofing.
Plumbing is less technically complex than electrical but the consequences of a leak inside a van are serious. Water damage to wood, insulation, and electrical components can be catastrophic and expensive to fix.
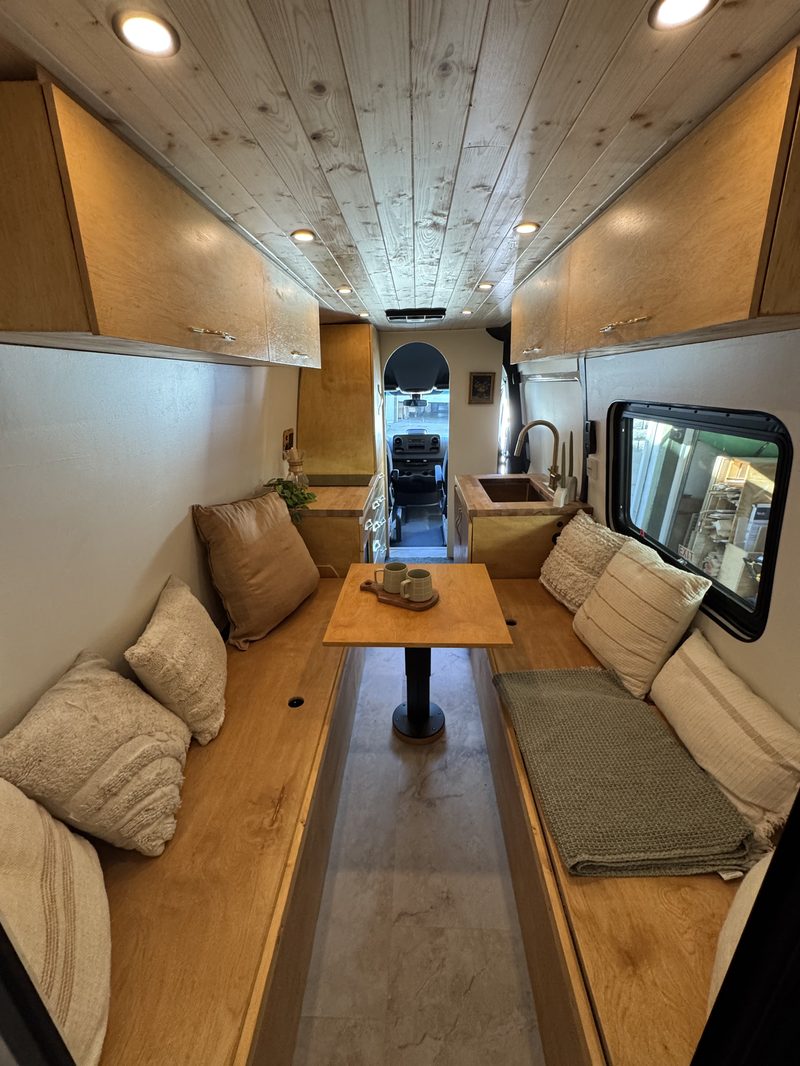
Cabinetry and Interior Build-Out
This is where the bulk of the time goes. Building cabinets, a bed platform, a kitchen counter, storage compartments, and finishing trim requires woodworking skills and patience. Every surface in a van is curved, angled, or irregular. Nothing is square. Templates, scribing, and test fitting are constant.
Most DIY builders report that cabinetry takes more hours than every other phase combined. If you enjoy woodworking, this is the rewarding part. If you don’t, it can be miserable.
Flooring, Walls, and Ceiling
After insulation and before cabinetry, you need to install the subfloor, wall panels, and ceiling panels. Common choices include vinyl plank flooring, tongue-and-groove wood paneling for walls and ceiling, and lightweight plywood substrates.
Climate Control
A diesel heater for cold weather and a roof vent fan (like a MaxxAir) for ventilation are standard in most builds. Installing a diesel heater requires cutting holes in the floor for the exhaust and intake, running fuel lines, and mounting the unit. It is not difficult but it needs to be done correctly for safety.
Exterior Work
Roof rack, solar panel mounting, shore power inlet, exterior lighting, window installation. Some of these require cutting into the van body, which is permanent and stressful if you haven’t done it before.
How Long Does a DIY Van Conversion Take?
Most DIY van conversions require 200 to 400 hours of actual hands-on build time. How that translates to calendar time depends on your schedule:
| Work Schedule | Estimated Calendar Time |
|---|---|
| Full-time (40+ hrs/week) | 3 to 6 months |
| Part-time (15-20 hrs/week) | 6 to 12 months |
| Weekends only (8-10 hrs/week) | 12 to 24 months |
Those estimates assume you know what you are doing. First-time builders should add 30 to 50 percent for learning curves, research time, and rework.
The phases that take the longest:
- Cabinetry and interior build-out — 80 to 150+ hours
- Electrical system — 40 to 80 hours (including design and research)
- Insulation — 20 to 40 hours
- Plumbing — 15 to 30 hours
- Everything else — 50 to 100 hours
The Hidden Time Cost
What the hour estimates don’t capture is the time spent on research, planning, ordering parts, waiting for deliveries, returning wrong parts, watching YouTube tutorials, redoing work, and making decisions. For most first-time builders, the non-build time equals or exceeds the actual build time.
DIY Van Conversion Cost Breakdown
Materials cost depends on the scope of the build. Here are realistic ranges for a Sprinter, Transit, or ProMaster conversion.
Materials Only (No Labor, No Vehicle)
| Build Level | Material Cost | What’s Included |
|---|---|---|
| Basic | $5K to $15K | Insulation, basic electrical (100-200Ah, 200W solar), simple bed platform, minimal cabinetry |
| Mid-range | $15K to $30K | Full electrical with lithium, solar, and inverter, insulation, kitchen with cooktop and fridge, custom cabinetry, diesel heater, roof vent |
| Full build | $30K to $50K+ | Everything above plus plumbing, hot water, shower, bathroom, premium appliances, upgraded finishes |
Tools
If you don’t already have a workshop, budget $500 to $2,000 for tools. Essential tools include a drill, circular saw, jigsaw, rivet gun, crimping tools, multimeter, and various hand tools.
Total DIY Cost (Materials + Tools + Vehicle)
| Used Van ($15K-$35K) | New Van ($50K-$70K) | |
|---|---|---|
| Basic build | $21K to $52K | $56K to $87K |
| Mid-range build | $31K to $67K | $66K to $102K |
| Full build | $46K to $87K+ | $81K to $122K+ |
Compare that to a professional conversion where the build labor adds $15K to $100K+ on top of materials.
The Five Most Common DIY Van Conversion Mistakes
We see these constantly — both from people who bring us vans to fix and from the broader van conversion community.
1. Underestimating the Electrical System
The battery and solar panels are maybe 30 percent of a complete electrical system’s cost. The charge controller, inverter, DC-to-DC charger, wiring, fuse blocks, bus bars, connectors, conduit, and distribution panel make up the rest. Budget accordingly, and do not cut corners on wire gauge or fuse protection.
2. Skipping Proper Insulation
Some builders insulate the ceiling and call it done. Walls, floor, and doors all need insulation too, or you will have massive thermal bridging and condensation problems. Condensation leads to mold and rust. Fixing insulation after the interior is built means tearing everything out and starting over.
3. Not Planning for Weight
A full conversion adds 1,000 to 2,500 lbs to the van. Water alone is 8.3 lbs per gallon — a 40-gallon tank adds 332 lbs when full. Lithium batteries, wood cabinetry, appliances, and gear add up fast. Exceeding the van’s GVWR is unsafe, illegal, and voids your insurance in a crash. Weigh the van at a CAT scale after the build.
4. Building Without a Complete Plan
Starting to build before you have finalized the layout, the electrical design, and the plumbing routing leads to expensive rework. Discovering that your water tank doesn’t fit after the cabinets are installed means tearing out cabinets. Run every measurement twice and mock up the layout with cardboard before cutting wood.
5. Scope Creep
This is the budget killer. You start with a $20K materials budget and a basic build plan. Then you add a shower. Then you upgrade the batteries. Then you decide on butcher block counters instead of plywood. Then you want a custom headliner. Before you know it, you have spent $45K on materials and the build has taken a year longer than planned.
Set your scope before you start and resist the urge to upgrade mid-build.
When DIY Makes Sense
A DIY van conversion is a great choice if:
- You have the time. 200 to 400+ hours is a real commitment. If you can dedicate consistent time over 3 to 12 months, it is feasible. If your schedule is unpredictable, the project can drag on indefinitely.
- You enjoy hands-on work. If you genuinely like building things, a van conversion is an incredible project. It covers woodworking, electrical, plumbing, and design in one build.
- You have a basic skill set. You don’t need to be a professional tradesperson, but comfort with power tools, basic electrical concepts, and general construction is important.
- You are doing a basic to mid-range build. Simple builds are very achievable for a first-time builder. Complex builds with full plumbing, custom cabinetry, and sophisticated electrical systems push most DIY builders to their limits.
- Budget is a primary constraint. If you have more time than money, DIY can save you $15K to $60K in labor costs.
When Professional Makes More Sense
A professional van conversion is worth considering if:
- You want it done in weeks, not months. A professional shop like ours completes builds in 4 to 12 weeks depending on scope. The same build could take a DIY builder 6 to 18 months.
- You need reliable systems. Electrical, plumbing, and gas systems that are designed and installed by experienced builders work right the first time. Troubleshooting a DIY electrical system at a remote campsite at 10pm is not fun.
- You value warranty coverage. Professional builds come with warranties on the workmanship and systems. DIY builds come with YouTube comments.
- The build is complex. Full bathroom, custom cabinetry, large electrical system, propane or diesel appliances — the more complex the build, the more the professional advantage shows.
- Your time has value. If you bill $75 per hour at your job and the build takes 400 hours, that is $30K in opportunity cost. At that point, hiring a professional may actually be cheaper.
- You tried DIY and got stuck. There is no shame in this. We regularly finish builds that started as DIY projects. Bringing in a professional to complete the electrical system, plumbing, or cabinetry is a perfectly reasonable approach.
The Hybrid Approach
You don’t have to go fully DIY or fully professional. A lot of people take a hybrid approach:
- DIY the simple stuff: Insulation, bed platform, basic cabinetry, painting, and trim work are all very DIY-friendly.
- Hire out the critical systems: Electrical, plumbing, and gas appliance installation are the areas where professional work makes the biggest difference in safety and reliability.
- Hire out the custom cabinetry: If woodworking isn’t your thing, having a shop build and install the cabinetry can save you the most time-intensive phase of the build.
We work with clients on partial builds regularly. If you have a van and you have done some work on it but need help with specific systems, get in touch. We will take a look at what you have and figure out the best path forward.
Getting Started With Your Van Conversion
Whether you go DIY, professional, or hybrid, the first steps are the same:
- Choose your platform. Sprinter, Transit, or ProMaster each have trade-offs. Read our comparison guide to see which fits your priorities.
- Define your scope. What systems do you need? How will you use the van? Weekend trips, extended travel, or full-time living? This determines the build level.
- Set a realistic budget. Use our van conversion cost guide to understand what things actually cost. Add 15 to 20 percent contingency.
- Plan the layout. Measure everything. Mock it up. Sleep in the van before building anything permanent.
- Build or hire. Make the call based on your skills, time, budget, and scope.
Need help deciding? Give us a call at (714) 257-5446 or email hello@emerycustombuilds.com. We are happy to talk through your project, whether you end up building it yourself or working with us.